
This article is part two of our custom Peakboard extensions series:
- Part I - The Basics
- Part II - Parameters and User Input
- Part III - Custom-made Functions
- Part IV - Event-triggered data sources
In the first part of this series, we explained how to build a simple Peakboard extension called MeowExtension. We created two classes in .NET:
- One for specifying the extension metadata.
- One for defining the Cat List data source.
In today’s article, we’re going to take things one step further: We’ll add some configuration options to our Cat List data source. These are the options that the user sees when they add a new Cat List data source. (Just like how the JSON data source has configuration options for the source URL, authentication type, path, etc.)
Make sure that you have read the first part of this series. This article won’t make sense otherwise. You can also take a look at the final code for this article.
Add a text parameter
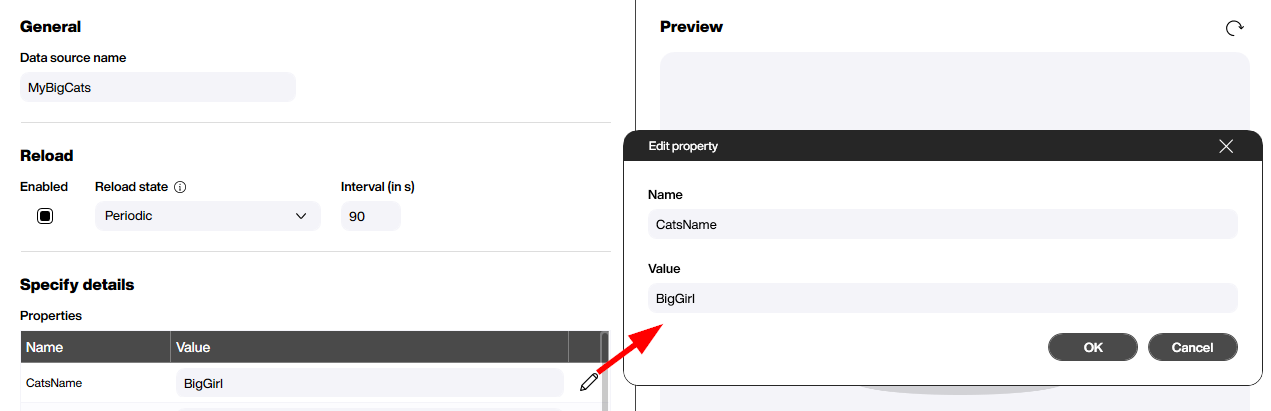
Now, let’s add a simple text parameter for the cat’s name, to our Cat List data source. To do this, we need to modify our CustomCatList class:
- Set
PropertyInputPossibletotrue, to indicate that our data source has parameters that the user can set. - Create a new
CustomListPropertyDefinitionto define our text parameter. - Add the
CustomListPropertyDefinitionobject to thePropertyInputDefaultscollection. This registers the property with the data source.
protected override CustomListDefinition GetDefinitionOverride()
{
    return new CustomListDefinition
    {
        ID = "CatCustomList",
        Name = "Cat List",
        Description = "A custom list for cats with breed and age information",
        PropertyInputPossible = true,
        PropertyInputDefaults =
        {
            new CustomListPropertyDefinition { Name = "CatsName", Value = ""}
        }
    };
}
Here’s what our parameter looks like in Peakboard Designer:
Get the parameter value
Of course, adding a parameter on its own isn’t very useful. We also want to use the value of the parameter (either the value that the user entered, or the default).
To get the value of a parameter, we override the GetItemsOverride function. This function provides a data object that contains a Properties collection. This collection contains all the parameter values. So, to get the value for our CatsName parameter, we do this:
protected override CustomListObjectElementCollection GetItemsOverride(CustomListData data)
{
    this.Log.Info("Generating cat list items for " + data.Properties["CatsName"]);

    // ....
}
We print the value of the CatsName parameter, by using the Log object. Log works as you would expect, and it supports all the standard logging levels, like Info, Verbose, Error, Critical, etc.
Validate the parameter value
The extension kit provides a standardized way to validate parameter values. That way, if the user enters an invalid value, Peakboard Designer will let them know and prevent them from saving the data source—until they fix the parameter value.
To validate a parameter value, we override the CheckDataOverride function. We process the parameter’s value, and if there’s a problem, we throw an exception. The exception message is shown to the user, to let them know what’s wrong with the value they entered.
For our CatsName parameter, let’s make sure that the parameter value is not empty:
protected override void CheckDataOverride(CustomListData data)
{
    if (string.IsNullOrWhiteSpace(data.Properties["CatsName"]))
    {
        throw new InvalidDataException("Please provide a good name");
    }
    base.CheckDataOverride(data);
}
Add non-text parameters
Now, what if we want to add a non-text parameter? For example, a boolean or a numeric parameter? In that case, the process is mostly the same—but we need to set the TypeDefinition field of our CustomListPropertyDefinition object.
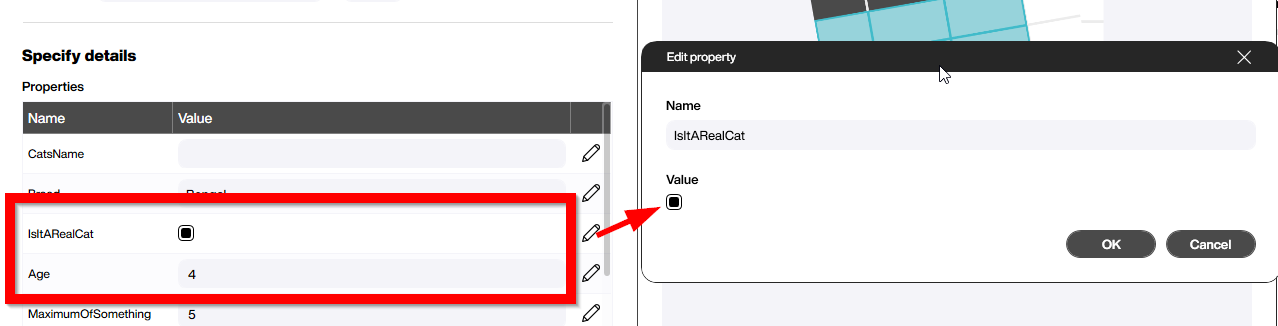
Let’s create two new parameters:
IsItARealCat, a boolean.Age, a number.
new CustomListPropertyDefinition { Name = "IsItARealCat", Value = "True", TypeDefinition = TypeDefinition.Boolean },
new CustomListPropertyDefinition { Name = "Age", Value = "4", TypeDefinition = TypeDefinition.Number },
Like before, we also need to add the new parameters to our PropertyInputDefaults collection. Here’s what our new parameters look like. You can see that Peakboard Designer handles their data types correctly.
Add a selectable-values parameter
Now, let’s say that we have a parameter where we don’t want the user to enter arbitrary values. Instead, we want them to choose from a predetermined selection of values. To do this, we set the selectableValues attribute of our TypeDefinition. We set selectableValues to the values we want the user to choose from.
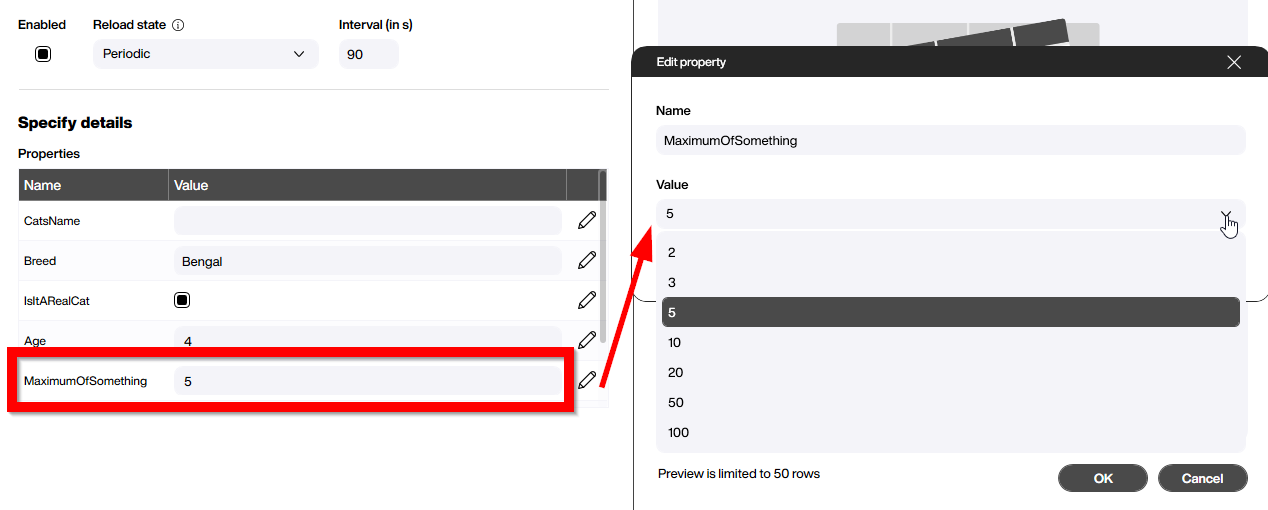
In this example, we define a numeric parameter, and we give it a few possible values:
new CustomListPropertyDefinition { Name = "MaximumOfSomething", Value = "5",
      TypeDefinition = TypeDefinition.Number.With(selectableValues: [ 2, 3, 5, 10, 20, 50, 100]) },
And here’s what it looks like in Peakboard Designer. You can see that the user gets a drop-down list, in order to choose the value that they want:
Add a masked parameter
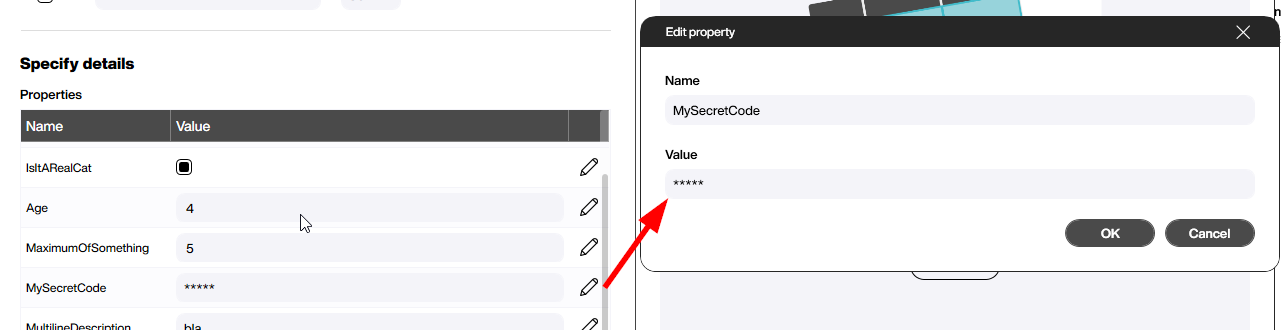
For passwords, connection strings, and any other potentially sensitive data, we want to mask the text that the user types in. To do this, we set the TypeDefinition attribute masked to true:
new CustomListPropertyDefinition { Name = "MySecretCode", Value = "18899", TypeDefinition = TypeDefinition.String.With(masked: true) },Here’s what the masked parameter looks like:
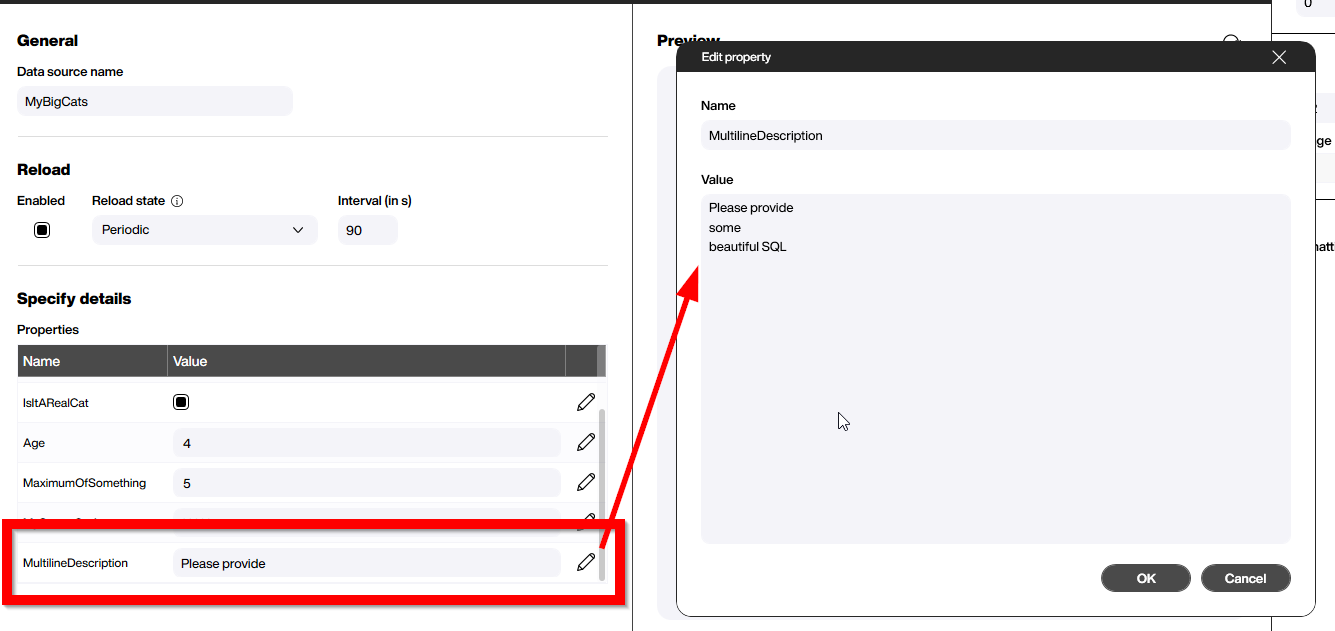
Add a multi-line text parameter
Finally, let’s create a multi-line text parameter. These parameters are typically used for long code-like text. For example, SQL statements or JSON / XML fragments.
Multi-line text is not a unique data type. Instead, a multi-line text parameter is a variant of a text parameter. To turn a text parameter into a multi-line text parameter, we set the TypeDefinition attribute multiLine to true:
new CustomListPropertyDefinition { Name = "MultilineDescription",
      Value = "Please provide\nsome\nbeautiful SQL", TypeDefinition = TypeDefinition.String.With(multiLine: true) }
Here’s what it looks like in Peakboard Designer:
Result
Defining the parameters of a data source is essential to creating a good user experience. The data types you choose and the parameter validation you do can really affect how easy your data source (and extension, in general) is to work with.
In the next part of this series, we’ll explain how to build functions that can be used in both LUA scripts and Building Blocks: Part III - Custom-made Functions.