In the past few weeks, we’ve discussed two I/O modules provided by ICP DAS: the ET-2254 and the U-7560M. In this article, we’ll take a look at the Advantech WISE-4012. This module provides a network connection via Wi-Fi. It offers two digital-only outputs and four analog/digital inputs.
We will look at the traditional way of communicating with MQTT, as well as an alternative method: The REST webservice. Depending on your use case, REST may be better than MQTT, because no MQTT broker is needed.

Module Configuration
The Wise-4012 comes with a typical interface for configuring the module. Under the Cloud tab, there is an option to activate MQTT connectivity and provide a broker for sending and receiving messages. The actual message consists of a single JSON string that covers all inputs and outputs.

Under I/O Status, we can set the four analog/digital inputs to either analog or digital. In our case, we use channel 1 for analog input.

The AI tab tells us if there’s already a real value on the analog input. This provides insight into the current measured at the input.

MQTT access
Here’s what the incoming JSON looks like:
{
  "s": 1,
  "t": "2024-08-08T17:48:21Z",
  "q": 192,
  "c": 0,
  "di1": true,
  "di3": false,
  "di4": false,
  "do1": true,
  "do2": false,
  "ai2": 7158.464,
  "ai_st2": 1
}
The following screenshot shows how to configure the MQTT data source on the Peakboard side. We use a data path to access the information inside the JSON. The actual values are translated directly into the columns of the output table, so there’s no need to process the JSON. The data source does it automatically.

Let’s discuss the other direction. In our test board, there are two buttons for switching the output on and off.

Let’s take a look at how to send the MQTT message. We’re re-using the MQTT connection from the data source.
The topic is Advantech/74FE488E8B86/ctl/do1. It’s made up of the serial number, followed by ctl, followed by the output channel name.
The JSON we send is pretty simple:
{"v":true}to switch the output on.{"v":false}to switch the output off.

Webservice and JSON
Besides the traditional MQTT connectivity, the Wise-4012 also offers REST endpoints to check the state of the input channels and set the output channels.
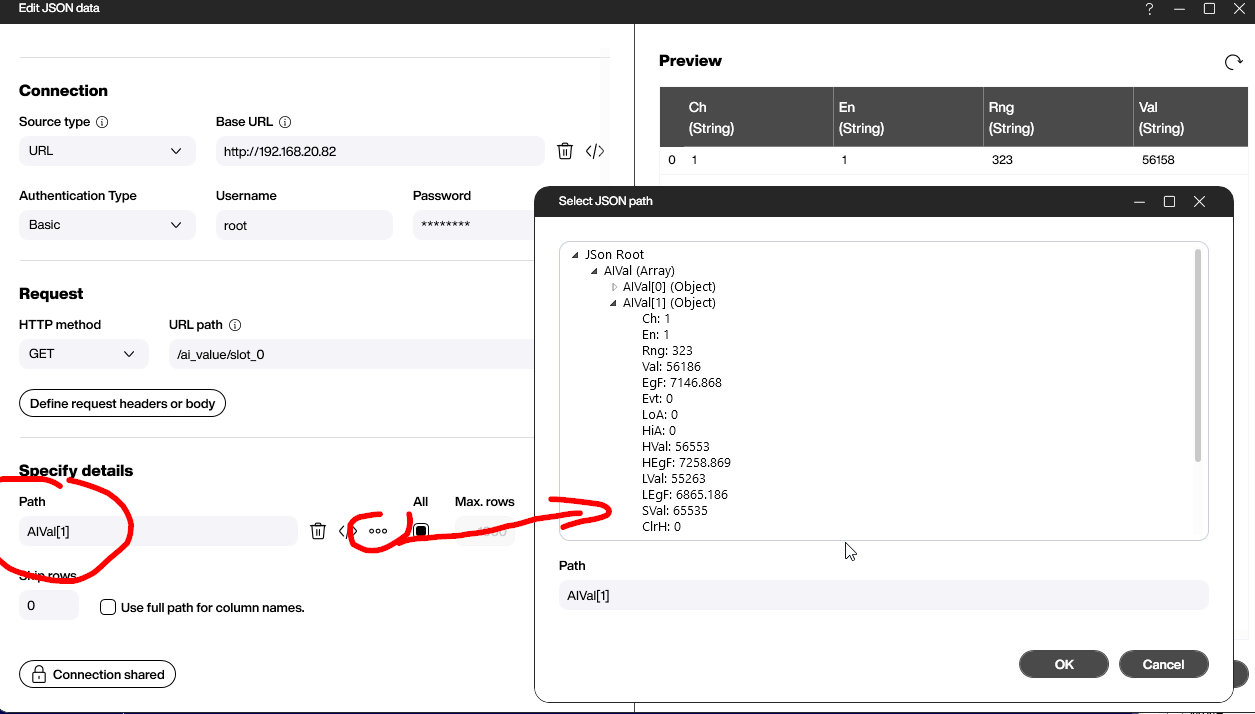
For the digital input, we use the http://<MyServer>/di_value/slot_0 endpoint. The following screenshot shows the JSON data source and the structure that is returned. We use the DIVal[0] path to access the first channel and get its value.

The endpoints for the analog inputs have /ai_value/ instead of /di_value/. So http://<MyServer>/ai_value/slot_0 returns the JSON with the analog input data.

To set the value of an output, we use the endpoint http://<MyServer>/do_value/slot_0 and submit the JSON string {"DOVal":[{"Ch":0,"Val":1}]}. This is similar to the MQTT message we used earlier. It’s very important to use the PATCH verb to submit the message. A regular PUT won’t do the trick. Here’s the Building Block script that performs the call:

Result and conclusion
Being able to use both MQTT and REST is a great feature of the Wise-4012. However, the following video shows a downside. Since MQTT is an event based protocol, any change in value is transferred and processed immediately.
On the other hand, getting input values via REST works by sending a pull request every few seconds. So when you need precise, real-time input, MQTT is a better choice. If a couple of seconds of lag is acceptable, REST might be easier, because no MQTT broker is needed.

