Peakboard offers a lot of built-in data sources for almost every kind of modern IT interface. Even when it comes to very exotic requirements, a lot of connectivity challenges can be solved with generic data sources, like ODBC for databases or JSON for lots of different kinds of REST services. We have discussed all these options already multiple times in this blog, so you can easily revisit them whenever you need a refresher.
Besides these generic options Peakboard also offers a very easy-to-use plug-in concept. We can build a DLL in our preferred .NET IDE with only very few lines of code and just plug it into our Peakboard application to use it almost like a regular data source. This concept is called Peakboard extensions, and it opens the door to tailor-made integrations. In our current series we will have a look at how to build these extensions, from a minimal version to more sophisticated options with complex parameters and event-triggered sources. Here are the parts:
- Part I - The Basics
- Part II - Parameters and User Input
- Part III - Custom-made Functions
- Part IV - Event-triggered data sources
The extension project needs a NuGet package called Peakboard.ExtensionKit that can be found here.
The project we’re building in this article can be downloaded here, so you can follow along step by step with the exact same setup.
Setting up the project
To build our first extension we will need a .NET project with the output format Library and Target Framework .NET 8. In the first iteration we will need two classes that are added later. In addition to the two classes we will need a file called extension.xml that is copied to the output folder. Here’s a sample of the extension.xml. It is later shipped to the Peakboard Designer and is used there to give the designer the chance to read some metadata about the extension.
<?xml version="1.0" encoding="utf-8" ?>
<ExtensionCatalog xmlns="http://schemas.peakboard.com/pbmx/2020/extensions">
  <Extensions>
    <Extension ID="MeowExtension"
               Path="Meow.dll"
               Version="1.2"
               Class="MeowExtension.MeowExtension" />
  </Extensions>
</ExtensionCatalog>
In addition to the XML file we will need a small icon, preferably as PNG, to be added to the project as embedded resource. So in total here’s the project file of our example project:
<Project Sdk="Microsoft.NET.Sdk">

  <PropertyGroup>
    <OutputType>Library</OutputType>
    <TargetFramework>net8.0</TargetFramework>
    <GenerateAssemblyInfo>false</GenerateAssemblyInfo>
    <ImplicitUsings>enable</ImplicitUsings>
    <Nullable>enable</Nullable>
  </PropertyGroup>

  <ItemGroup>
    <PackageReference Include="Peakboard.ExtensionKit" Version="4.0.1" />
  </ItemGroup>

  <ItemGroup>
    <None Include="extension.xml">
      <CopyToOutputDirectory>PreserveNewest</CopyToOutputDirectory>
    </None>
    <EmbeddedResource Include="MeowExtension.png" />
  </ItemGroup>

</Project>
Set up the extension class
The extension itself is represented by an extension class that is derived from the base class ExtensionHost. The method GetDefinitionOverride() is overridden to provide more metadata about the extension like a unique ID, version, and description. It’s important that these values must be aligned with the values we used in the extension.xml so that Designer and runtime always interpret the package consistently.
The second function to be overridden is GetCustomListsOverride(). It is supposed to return a collection of lists that are provided by the extension. Let’s assume we are building an extension to access an ERP system. We can have different lists like one for products, one for customers, and one for orders all in the same extension. In our example one list is enough, so we add only one instance to the collection of lists to keep things tidy while we learn the basics.
public class MeowExtension : ExtensionBase
{
    public MeowExtension(IExtensionHost host) : base(host) { }

    protected override ExtensionDefinition GetDefinitionOverride()
    {
        return new ExtensionDefinition
        {
            ID = "MeowExtension",
            Name = "Meow Extension",
            Description = "A Peakboard extension for cats",
            Version = "1.2",
            Author = "Meow Development Team",
            Company = "Meow Inc.",
            Copyright = "Copyright © Meow Inc.",
        };
    }

    protected override CustomListCollection GetCustomListsOverride()
    {
        return new CustomListCollection
        {
            new CatCustomList(),
        };
    }
}
Set up the list class
In the extension class we already used the class that represents the actual list. Every list within our extension is derived from the base class CustomListBase. The overridden function GetDefinitionOverride returns some metadata for this dedicated list so it can be handled correctly by the hosting system and have a good UI for the end user, even when the extension grows more complex later on.
[CustomListIcon("Meow.MeowExtension.png")]
public class CatCustomList : CustomListBase
{
    protected override CustomListDefinition GetDefinitionOverride()
    {
        return new CustomListDefinition
        {
            ID = "CatCustomList",
            Name = "Cat List",
            Description = "A custom list for cats with breed and age information",
        };
    }

    // [......]

}
The second function we need to override is GetColumnsOverride. It is called by the host system every time it needs the actual columns to represent the data. In our example we have fixed columns, so we just create a collection of columns and return the collection to the caller. Depending on the use case columns can also be returned dynamically depending on certain parameters the user is providing. We will discuss parameters in the second part of the series. Beside the name the only thing that represents a column is the data type: Number, String, or Boolean.
protected override CustomListColumnCollection GetColumnsOverride(CustomListData data)
{
    var columns = new CustomListColumnCollection();
    columns.Add(new CustomListColumn("ID", CustomListColumnTypes.Number));
    columns.Add(new CustomListColumn("Name", CustomListColumnTypes.String));
    columns.Add(new CustomListColumn("Breed", CustomListColumnTypes.String));
    columns.Add(new CustomListColumn("Age", CustomListColumnTypes.Number));
    columns.Add(new CustomListColumn("ImageUrl", CustomListColumnTypes.String));
    return columns;
}
The last function we need to override is GetItemsOverride(CustomListData data). The function delivers the actual data to the caller. This table-like data is represented by a collection of objects called CustomListObjectElementCollection. It holds the rows of the table as instances of the class CustomListObjectElement that in turn contain a collection of key/value pairs that represent the table cells.
protected override CustomListObjectElementCollection GetItemsOverride(CustomListData data)
{
    var items = new CustomListObjectElementCollection();

    // Add cat data directly to items
    var item1 = new CustomListObjectElement();
    item1.Add("ID", 1);
    item1.Add("Name", "Fluffy1");
    item1.Add("Breed", "Persian");
    item1.Add("Age", 3);
    item1.Add("ImageUrl", "https://example.com/cat1.jpg");
    items.Add(item1);

    var item2 = new CustomListObjectElement();
    item2.Add("ID", 2);
    item2.Add("Name", "Whiskers");
    item2.Add("Breed", "Maine Coon");
    item2.Add("Age", 5);
    item2.Add("ImageUrl", "https://example.com/cat2.jpg");
    items.Add(item2);

    return items;
}
Packing the extension
The compiled binaries must all be put into one single ZIP file. In our example the binary is only the DLL, but there might be other artifacts that can be packed as well, e.g. debug symbols or other referenced assemblies that might be necessary to run the extension. In addition to these artifacts we need to place our extension.xml into the ZIP file to ensure the Designer can read the metadata right away.
All files that are contained in the ZIP are deployed to the Designer and then later deployed to the Peakboard Box or BYOD instance when the application that uses the extension is deployed to its destination.

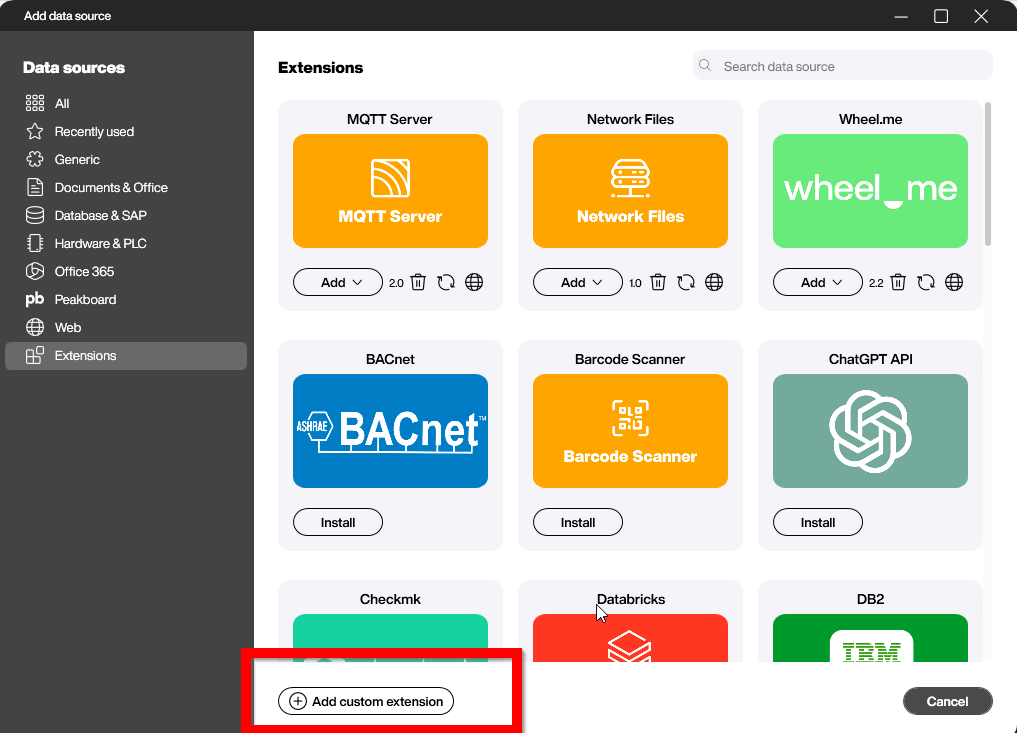
Using the extension in Peakboard Designer
To install the extension in the Peakboard Designer we just add it in the data source / extension dialog, making sure we point to the freshly created ZIP package.
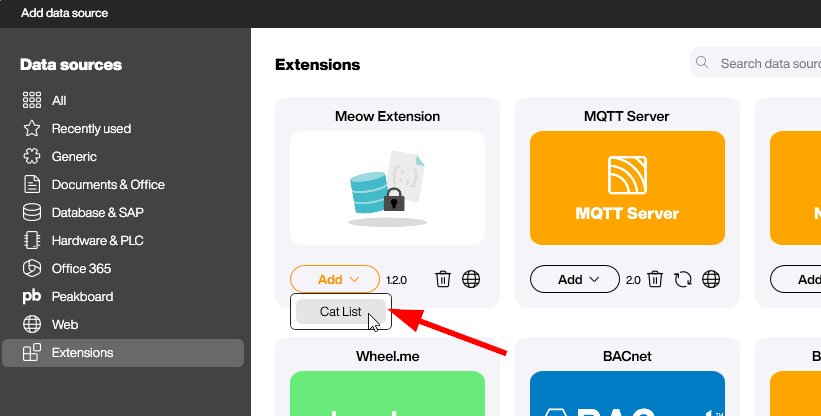
After restarting the Designer we can add our custom list as data source. All available lists of the extension are listed in the drop-down, so you can immediately select the new list without additional configuration.
The last screenshot shows the preview mode of the data source based on our example extension after hitting the refresh button. So far the extension doesn’t offer any parameters for the user. This is what we will discuss in the next article of the series, where we will extend the foundation with interactive options.
